Tuesday, August 30, 2022

Ellen Hutson August Challenge


While I haven't had a chance to join in until today, I'm so happy that the team at Ellen Hutson LLC has brought back their monthly challenges.  I'm sliding in at month's end with my entry.  


Here's the mood board...


I chose three colors from the mood board and three Ellen Hutson stamp sets for my background design.  I stamped the images onto a white cardstock panel in a random manner adding in the black stamped images to fill in the open spaces.  The sentiment was stamped, cut and then stacked three high.  The sub-sentiment was stamped and heat embossed onto a strip of ink swiped cardstock.  I finished my card off with a sprinkling of clear droplets.  


Supplies:
Ellen Hutson - Organic Elements stamp set
Ellen Hutson - Abstract Nature stamp set
Ellen Hutson - Stay Cool stamp set
Ellen Hutson - Lucky stamp set
Ellen Hutson - Clear Droplets
Catherine Pooler Inks - Dress Blue/Lemon Grass/Martini


As always, thanks so much for spending a bit of your day with me.

Jules

Saturday, August 20, 2022

Sisterhood of Snarky Stampers #216

 
We are returning to our regular Sisterhood Saturday posts with a new prompt from Edna.  For the next fortnight we would like to see your "O is for OLD" cards.  

It was time for me to return to the hilarious antics of the "elder" illustrations from Art Impressions.


One might think that my elder is screaming 
in pain, however one would be mistaken.


She is aghast at your age.  :-)


Anyone else thinking "Where's Waldo?"


I combined two "new to me" stamp sets from AI to create my scene.  The cat (from a Halloween set) was originally riding a broomstick but with some creative fussy cutting, she is now attached permanently to Marge's leg.  (Both of these images were colored with Copics.) I grabbed some snippets of 6x6 designer paper to create the parlor decor, adding in some stamping for the flooring and some score lines to create the illusion of an old wallpaper job.  For additional details I swiped some Distress Oxides over top to give the room an aged feeling.  The sentiment was stamped onto a die cut speech bubble.  The panel was matted in black and adhered to a gold colored card base.

Supplies:
Art Impressions - AHH! stamp set
Art Impressions - Fright Night stamp set
Ink Blot Shop - Get Grounded stamp set
Honeybee Stamps - patterned papers
Altenew - Speech Bubbles die set

We invite you to visit our blog for more snarkiness and hope you'll link your project to our gallery!

As always, thanks so much for spending a bit of your day with me!

Jules


Thursday, August 18, 2022

Seize the Birthday #245


It's a Seize the Birthday Thursday once again and we have a new topping for you to try out.  This one is a bit different and very fun.


We are asking you to use the sketch below to create your birthday card.  


Sketch interpretation tends to be an individual preference.  I am one who tends to loosely follow the design and add my own spin so I used the wide vertical and horizontal strips as a guide for the placement of my florals.

I began with a stencil/die combo to ink blend and die cut two sets of the same floral.  I adhered one vertically and the other horizontally, snipping a bit here and there for better flow.  All that was left was to stamp the greeting and add some pretty pearls.  

Supplies:
Altenew - Hill Blossoms stencil and die combo
Ellen Hutson - Totally Random Sayings Vol 3  sentiment stamp set
Trinity Stamps - Captivating Cantaloupe pearls

I invite you to visit our blog and hope to see your birthday card in our gallery.  The topping is always optional.


As always, thanks so much for spending a bit of your day with me.

Jules


Tuesday, August 16, 2022

Happy Dance Day 2 - Spellbinders Dancin' Mummy


As promised, I'm back today with another card creation made with a brand new die set from Spellbinders.  Today's card features Dancin' Mummy from their Boo Dance Party Collection which was released on August 14th.  (If you missed my Dancin' Ghost cards you can find my post here.)


As with Dancin' Ghost, this cute mummy has detached legs which are designed to produce a swinging motion when the card is tilted.  Spellbinders has released a set of sentiment stamps that coordinate with their Dancin' line of dies but alas, I don't currently own them.  I opted for a punny greeting of my own that I think gives this card a bit more versatility.  

I began by die cutting his rags/bandages from a pale gray cardstock which I grunged up with some Distress Oxide.  The body/eyes were cut from from a pale blush and black cardstock, respectively.  I adhered the bandages to his body/legs with liquid glue and then set about to create my background.  

I used an embossing folder from Fun Stampers Journey to create a 3D cloud texture onto a panel of black cardstock.  To accentuate the clouds I added a soft blend of white pigment ink over top.  I stamped the sentiment in Versamark ink using individual alpha stamps and then heat embossed it in white.  I adhered the mummy's body to my background using a plastic disk behind the legs so that they could swing freely.  Before adhering the panel to my card base I matted it with a narrow border of gray cardstock.  

I hope you enjoy today's creation.  I'm including links to the supplies below. (These will be replaced with affliate links soon.)


Head in the Clouds embossing folder (I used a discontinued one from Fun Stampers Journey however this one will work just as well.)


My thanks to Yana and Spellbinders for the wonderful opportunity to play with these cute die sets.  I hope I've inspired you to check out their newest releases which include Christmas themed sets as well.


And, as always, thanks so much for spending a bit of your day with me!

Jules


Monday, August 15, 2022

Happy Dance...Literally - Dancin' Ghost from Spellbinders


Imagine my surprise to discover an email from Spellbinders earlier this summer asking me if I'd like to play along with a few pre-release die sets.  Let's just say that my response was a very quick "Yes!"  Not only am I honored at the opportunity but also honored that my little crafty creations caught someone's eye.  In the midst of a very sad summer this was definitely a boost for me. 

Today I'm sharing two cards created using dies from the Spellbinders Boo Dance Party Collection which was released yesterday.  This die set, Dancin' Ghost, was totally calling out my name.  

The Dancin' Ghost set includes a ghost with detached swinging legs, a pumpkin bucket, a paper sack, candy and a sentiment.  My card below was created with the ghost and pumpkin bucket. 


I was looking to create a whimsical Halloween card so I chose some bright dye inks, created my own stencil from a transparency and went to work with some ink blending.  The ghost was die cut from white cardstock, the eyes from black and the legs from a combination of teal and white.  The legs are a separate die made with an open circle at the top so that, when adhered with a plastic stacker, they swing freely when the card is tilted.  The jack-o-lantern candy bucket was die cut from orange and black cardstocks.  The speech bubble stamp is from an older discontinued Ellen Hutson as is the sentiment stamp which was heat embossed in white.  I adhered the ghost with foam tape and popped up the card panel using piece of very thin fun foam.  I really love the playful feel to this "not so spooky" card.


My second card is a horizontal slimline and features the ghost in triplicate along with additional Spellbinder dies from my stash.  It most definitely has the traditional spooky Halloween vibe to it.


I began this card with the background.  I used several Distress Oxide inks to blend out the night time sky, adding in splatters of white and black ink.  The sidewalk is merely a strip of gray cardstock that I manually scored to create a bit of texture.  

All die cutting for this card was done with white cardstock which I colored with Copic markers.  The paper bags, jack-o-lantern and BOO dies are included in the Dancin' Ghost set.  The door is from an older Spellbinders Die of the Month kit as is the arm you see poking out from behind the door.  I thought together this made for a fun scene.  

I hope you enjoy today's creations.  I'm including links to the currently available supplies below. (These will be replaced with affliate links soon.)


Door - Always Welcome (Die of the Month Oct. 2020)
Arm - First Crush (Die of the Month Jan. 2019)  


Please visit back tomorrow for another card share which uses another new set called Dancin' Mummy.

My thanks to Yana and Spellbinders for the wonderful opportunity to play with these cute die sets.

And, as always, thanks so much for spending a bit of your day with me!

Jules

Sunday, August 14, 2022

Perfectly CAS August Challenge


The Perfectly Clean and Simple team is back with a new monthly challenge and this time around we would love to see embossing on your card.


As always we are looking for cards that use 1/3 (or less) of the card front in your design.  There are several types of embossing and the choice is entirely up to you.  


I began with a striped embossing folder and a scrap of white cardstock.  After running the paper through my die cutter I swiped it horizontally with my Distress Oxide pad.  I added a messy nest of silver thread, a die cut washi tape flower and the sentiment.  I adhered it all to a white card panel which was popped up onto the card base with fun foam.

Supplies:
Heidi Swapp - horizontal lined embossing folder
Pink Fresh Studio - Rainbow Floral washi 
Simon Says Stamp - pre-printed sentiment strip
Distress Oxide - Speckled Egg
silver thread

I invite you to visit our blog and hope to see your creation in our gallery.

As always, thanks so much for spending a bit of your day with me!

Jules

Monday, August 8, 2022

Happy Little Stampers - August Anything Goes With Dies


Today's card share is for our August die challenge over at the Happy Little Stampers blog.  No special prompts required.  Just use a die cut in any shape or fashion and link it to our gallery. It's that simple.  


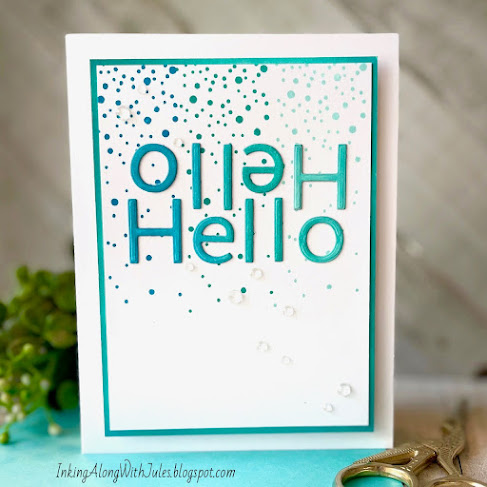
Anyone else singing Hello/Goodbye by the Beatles?
If not, you are now.  
You're welcome.  


To create my card I began by ink blending a piece of smooth cardstock with blue and green hues of Distress Oxide to create a horizontal ombre look.  I used this piece to die cut the sentiment.  Using the same horizontal color combo I stamped the circles onto a white card panel before adhering the sentiment.  I wanted a narrow border so I swinked the edges of a slightly larger panel of cardstock with one of the Distress hues and then stacked the pieces onto a white card base.  I added in a generous sprinkling of clear droplets in a diagonal from top left to bottom right.  

Supplies:
Simon Says Stamp - Flipped Hello die set
Simon Says Stamp - Falling Background stamp
Trinity Stamps - Crystal Clear mix

I invite you to visit our blog and hope to see your card in our gallery.

As always, thanks so much for spending a bit of your day with me!

Jules

Saturday, August 6, 2022

The Sisterhood of Snarky Stampers - Honoring Lindsey


These posts aren't getting any easier so I'll get right to it.  I hope you'll join us at the Sisterhood where we are honoring our Snarky Sister Lindsey.  


If you missed my first post about the loss of our dear friend please read it here.  

Lindsey was actually the one who brought me into this lovely fold of strong women who called themselves the Snarky Sisterhood.  We have a lot of laughs and try not to take things too seriously, especially when it comes to our shared hobby.  I gave my card a lot of thought and while it will seem goofy to most, I know she would have loved it.  

She and I shared a love of many things, Star Trek included.  I have loved that show since I was a kid in the early 70s watching reruns after school and still watch it regularly even today.  Here is my card in her honor.


In the words of Spock....   

    I miss you my dear friend.  


My card front in brief ...  I created the Enterprise by hand as I'm sure it shows. *wink*  The background is a blend of Distress Oxides and splatter.  The orange planet is also Distress Oxides covered with a generous amount of Glossy Accents and glitter.  The sentiment is a mix of stamping and alphabet stickers.  The inside sentiment was computer generated.  If you're a Star Trek fan, you'll recognize the quote.

Please join my teammates over at the Sisterhood blog where we are celebrating "L is for Lindsey."  If you were a friend of hers we'd love to see your Lindsey inspired card.  If you didn't know her well (or at all) Lindsey loved the colors purple and red.  She loved flowers, gardening, happy hour beverages, tea, cats, books and of course, Star Trek.  We would be honored if you would share your card in our gallery.


As always, thanks so much for spending a bit of your day with me.


Jules 


Thursday, August 4, 2022

Happy Little Stampers - August Christmas Challenge


It's time once again for our monthly Happy Little Stampers Christmas challenge.  Our (optional) theme for August is Flowers.


I wanted to create my card without the use of the obvious holiday poinsettias.  I have no idea what flower this is but stamped in red, I think it works for Christmas.  


I went full-on Betsy Veldman when creating my card.  As I'm sure you know, Betsy was an amazing designer with Papertrey Ink before venturing out on her own with The Greetery.  My card uses her designs from both companies.

I started with this subtly patterned holiday designer paper for my background which I matted with a narrow red border.  I stamped the florals and sentiment in the bottom right and added a sprinkling of clear droplets.  I adhered the finished panel to a card base made with light gray cardstock.  Very simple indeed.

I invite you to visit our blog and hope to see your holiday card in our gallery!

Supplies:
Papertrey Ink - Older Christmas Market kit by Betsy Veldman
The Greetery - 
Simon Says Stamp - Clear Droplet mix

This is actually my second post for the day.  Scroll down if you missed my card for the latest Seize the Birthday challenge.  

As always, thanks so much for spending a bit of your day with me!

Jules


Seize the Birthday #244


It's time for our first August challenge over at the Seize the Birthday challenge blog.  For this challenge we are looking for card designs that use NO stamping.  Thanks to my friend Michele and her generous sharing of these beautiful die cut washi tapes, my card was very easy to create.  


I laid out my initial design onto a white card panel and then flipped through my cover dies to see what I could do to jazz it up a bit.  I ended up die cutting through a transparency in order to have a polka dot stencil.  I used Distress Oxide Spun Sugar to create this soft background to the washi die cuts.  I popped a pre-foiled sentiment onto the design with foam tape and then added my customary sprinkling of pearls.  Sometimes simple is just best, don't you think?

I invite you to visit our blog and hope to see your birthday card in our gallery.  The topping is always optional.

Supplies:
Pink Fresh Studio - Hydrangea Rose washi tape
Pink Fresh Studio - Foiled Sentiment Ephemera
CC Designs - Circle Cut and Stitch Cover die
Little Things by Lucy - Glossy Watermelon pearls

As always, thanks so much for spending a bit of your day with me.

Jules


Monday, August 1, 2022

Color Hues/Seize the Birthday -- Honoring Lindsey


This is going to be a very difficult post to write.  As many of you already know, the cardmaking community lost one of it's own last week.  I personally have lost one of my dearest friends.  Today is all about Lindsey Martin-Penny.


Before I dive into the challenge details, let me tell you a little bit about my friend Lindsey.

We "met" during one of Tracey McNeely's 25 days of Christmas tags event years ago.  Lindsey contacted me through social media inquiring about the birch background paper I used in my photography.  It happened to be from Pier One and she asked if it would be okay if she used it as well. Duh!  I was so honored that she even noticed.  Occasional conversations would take place, usually in the comments of each other's posts but where we really bonded initially was over books.  I have a little IG account where I post my thoughts about the books I've read. (I'm really far behind at the moment if you're checking.)  As a former librarian Lindsey was an avid reader and some of my most favorite books and authors are a result of her many recommendations.  As the years passed we became close and emailed several times a week.  Topics included crafting, books, recipes, cocktails, our love of Star Trek, our families, etc.  Emails turned to texting.  Texting soon became a daily occurence.  I still find myself reaching for my phone to text her.  My world is so very sad right now.  

On to the challenge:

Today Seize the Birthday is playing along with their Sister Challenge, Color Hues as Lindsey was a member of both teams.  Today's challenge was to be hosted by Lindsey so the Design Teams want to honor and celebrate her beautiful creative life by sharing "Lindsey Inspired" projects using her previously chosen colors of Blue and Purple.  (Love ya Lins but purple will never be a favorite.  LOL!)  In addition to the chosen color duo we encourage everyone to incorporate Lindsey's favorites into their card.  No sympathy cards please.  She would want us all to be happy.  


As I previously mentioned card themes may include the following:

Humor/Humour
Cats
Gardening
Reading
Friendship
Wine/Spirits
Tea


On to my card:


She and I shared so many common interests so choosing a theme was difficult.  I will be honest.  I scrapped the first three versions (all of them totally different from each other) and in the end decided to just go with a Clean & Simple thank you card.  (CAS was her favorite style to create.)

My design is quite simple.  I stamped the heart onto a white card panel and colored it in with different hues of purple and blue alcohol markers.  I stamped my sentiment below the heart, trimmed down my panel and then adhered it to a slightly larger piece of black cardstock for the narrowest of mats.  I popped the completed panel onto a white card base using a piece of black fun foam.  As a final touch I added a bit of Wink of Stella to the center heart before applying Glossy Accents over the top.  I think Lindsey would approve.  

Supplies:
Simon Says Stamp - Center Cut Heart rubber stamp
Simon Says Stamp/CZ Design - Simply Thank You clear stamp set

I hope to see the Color Hues gallery filled with tributes to Lindsey.  Thank you in advance.
_________________

I didn't want to take away from Lindsey but I would be remiss if I didn't mention my recent absence from blogland/social media.  My father passed away quite unexpectedly on July 3rd.  My parents have lived with us for the past year so not seeing him every day has been especially difficult. My world is indeed extremely sad nowadays.  Miss you Pops.  

As always, thanks so much for spending a bit of your day with me.

Jules