Thursday, September 30, 2021

Seize the Birthday #224


It's time for another challenge over at the Seize the Birthday blog where Shirley has chosen Cake as our topping.  Very appropriate, don't you think?  


I've had this stamp set forever but it hasn't seen the light of day until now.  Thank goodness for challenges!  


I began by stamping, die cutting and Copic coloring my images.  I channeled my inner Kathy Racoosin by adding some texture to her apron with a rag and some colorless blender.  (I really need to remember to do this more often.)  I also added some interest to the reds with a white gel pen.  The background was made using an embossing folder and white pigment ink.  I thought she needed a bit of grounding so I stamped the border which I added to the bottom of the panel.  The sentiment is white heat embossed.  (I actually did this after the embossing and surprisingly had no problem.  Yay for small crafty successes....LOL!)  I adhered the panel to a white card base leaving a nice wide border.  

I invite you to come visit the blog for more inspiration from my teammates. We'd love to see your card in our gallery!  

Supplies:
Ellen Hutson - Baker Lady stamp set
Ellen Hutson - Handful stamp set (sentiment)
Avery Elle - Indigo stamp set (border)
Art Impressions - Birthday Hat stamp set (cake)
Fun Stampers Journey - Pretty Plaid embossing folder


I'm also entering this into Darnel's NBUS challenge.  My virgin stamp set is virgin no more.  hahahaha!


Continue to stay safe and healthy my friends.   _____________________________________________________________________________

Thank you for visiting my little crevice of the crafty blogosphere.  Your time, comments and friendship are much appreciated.  

Happy Crafting!

Jules 

Tuesday, September 28, 2021

CAS Colours and Sketches #439


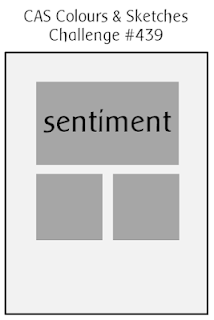
We're winding down the month of September at the CAS Colours and Sketches challenge blog with a new sketch from our hostess Jenny.  Let's dive right in.  


Here's the sketch....

Feel free to rotate and/or flip our sketches
 to meet your design needs.


And here's my card...


I began with a panel of soft medium grey cardstock, a stencil and white pigment ink.  I had to get creative with the four pane window stencil in order to achieve the look in the sketch but it was doable.  I die cut the poinsettias from red and grey cardstock and stacked them for a dimensional look.  I die cut the sentiment and shadow layer from two tones of grey, adhered it across the bottom of the top blended rectangle and then added the stacked poinsettias in a triangular position. I stamped the sub sentiment in crisp black pigment ink and finished it off with some strategically placed crystals.  

I invite you to visit our blog and hope you're inspired to play along with us this week!


Supplies:
MFT - Window Panes stencil
Simon Says Stamp - Merry die
Simon Says Stamp - Christmas Tiny Words
Poppystamps - Small Blooming Poinsettia dies
Trinity Stamps - crystal clear mix


Continue to stay safe and healthy my friends.   _____________________________________________________________________________

Thank you for visiting my little crevice of the crafty blogosphere.  Your time, comments and friendship are much appreciated.  

Happy Crafting!

Jules 


Tuesday, September 21, 2021

CAS Colours and Sketches #438

It's Tuesday which means we have a new challenge up over at the CAS Colours and Sketches  blog.  This week Jenny has chosen a beautiful trio of colors for our cards.  


I pulled out my Copic chart and selected three colors of alcohol markers that matched the chosen trio.  


It didn't take much product to create my card.  I began with a geometric die which I ran through my die cutter using white cardstock.  I colored the geometric pieces with Copics using the pattern you see in my image. (It's important to keep all of the tiny pieces when doing an inlay like this.)  I stacked the frame portion three times to create dimension, adhered it to the card front and then popped in my colored triangles/pentagons.  I added a black die cut word sentiment with an accompanying white shadow layer and some black and white enamel dots to finish it off.

I invite you to visit our blog and hope you're inspired to play along!

Supplies:
Reverse Confetti - Geometric Panel cover die
Simon Says Stamp - Thanks and shadow die

Continue to stay safe and healthy my friends.   _____________________________________________________________________________

Thank you for visiting my little crevice of the crafty blogosphere.  Your time, comments and friendship are much appreciated.  

Happy Crafting!

Jules 


Saturday, September 18, 2021

Sisterhood of Snarky Stampers # 194

Welcome back to another challenge brought to you by the Sisterhood of Snarky Stampers!  Our prompt this fortnight could be a real challenge and we're excited to see your ideas for ...


U is for Ugly.

Edna's looking great but that dog and kitchen are 
most definitely some kind of ugly. 
Great job Lee!


The first thought that came to my mind was Ugly Sweater.  I had a sentiment that fit the bill so I sorted through my tried and true stash of Art Impressions stamps and found one that I thought would work,


I opted to create a holiday tag rather than a card.  I pulled out some patterned paper pads and chose something festive for her outfit which I paper pieced onto a white tag.  I colored her skin in with Copics, added tiny gold stars and a coordinating paper to use as a border.  I finished it off with some twine and holiday bells.  Someone invite her to a holiday party!  

I invite you to come visit us at the blog where you will find loads more inspiration and hope to see your "ugly" creation in our gallery.  Remember....snark is appreciated but isn't required to play along.  


Supplies:
Art Impressions - Golden Oldies
Hero Arts - Offbeat Holiday stamp set
Spellbinders - holiday bells
Honeybee Stamps - gold star confetti
Taylored Expressions - Build a Scene patterned papers


Continue to stay safe and healthy my friends.   _____________________________________________________________________________

Thank you for visiting my little crevice of the crafty blogosphere.  Your time, comments and friendship are much appreciated.  

Happy Crafting!

Jules 


Thursday, September 16, 2021

Seize the Birthday #223


It's time for another challenge over at the Seize the Birthday blog 
where our topping this fortnight is Stitching!


You may use faux stitching or dive right in for the real thing.  
We aren't picky.  Just remember to make it a birthday card.


I have poor old arthritic hands so stitching isn't something I find 
enjoyable to do but I'm usually willing to "take one for the team."  


I kept my card front very simple.  I used a stitching die to cut the design into the bottom third of my front panel and then proceeded to very slowly (as in days and days...) to do some simple stitching with two metallic threads.  (silver and turquoise)  I stamped the sentiment over top and cut the panel down just a tiny bit so allow the black card base to peek out.  I finished it of with some silver rhinestones.  I don't see myself doing this often but I really do love the final look of this card.  

I invite you to visit our blog and hope to see your card in our gallery!  

Supplies:
Spellbinders - Merry Stitching die
Memory Box - Signature Greetings stamp set
Trinity Stamps - silver rhinestones


Continue to stay safe and healthy my friends.   _____________________________________________________________________________

Thank you for visiting my little crevice of the crafty blogosphere.  Your time, comments and friendship are much appreciated.  

Happy Crafting!

Jules 


Tuesday, September 14, 2021

Perfectly CAS September Challenge


It's time for another Perfectly CAS monthly challenge where the theme for September is Geometrics.


Remember, the goal is to use only 1/3 of the card front as your design space.
Trust me, it's not always as easy as it sounds.  :-)


I opted to use squares as my geometric and got a bit "fancy" 
by turning them on point to create diamonds.


I started by ink blending white card scraps with three colors of Distress Oxides.  (Peacock Feathers, Picked Raspberry and Twisted Citron.)  I cut them with my trimmer to be 1 1/4" square and arranged them in the horizontal center of my white card front, overlapping the edges before adhering them down.  I used a hello die to create the sentiment from black cardstock, adhered it to a black card base and finished it off with a sprinkling of clear droplets.  

I invite you to visit our blog and come play along with us this month!  We'd love to see your card in our gallery.

This is my second post for today in case you missed my first post earlier this morning. 


Supplies:
Distress Oxides
CZ/Simon Says Stamp - Just Words 1 die set


Continue to stay safe and healthy my friends.   _____________________________________________________________________________

Thank you for visiting my little crevice of the crafty blogosphere.  Your time, comments and friendship are much appreciated.  

Happy Crafting!

Jules 


CAS Colours and Sketches #437


The CAS Colours and Sketches team are back on the blog this week with a new challenge.  This week we'd like for you to incorporate this wonderful sketch by Jenny into a slimline card.  


I'm still having fun with my graphic stamps so I incorporated them into something a bit different.


My card is a mini slimline which for me is a final size of 6.25" x 3.5".  I started off by stamping the rectangular blocks to create the background.  Over top I added a gold embossed line of squiggles.  I Copic colored my whale and added some gold embossing and white gel pen to him for a bit of detail.  I adhered my panel to a blue card base, adhered the whale to the left side and finished it off by adding in the stamped sentiment and crisscrosses.

I invite you to visit the blog and hope to see your card in our gallery!

Supplies:
Ellen Hutson - S'Whale stamp set
Ellen Hutson - Organic Elements stamp set
Ellen Hutson - Stay Cool stamp set

Continue to stay safe and healthy my friends.   _____________________________________________________________________________

Thank you for visiting my little crevice of the crafty blogosphere.  Your time, comments and friendship are much appreciated.  

Happy Crafting!

Jules 


Wednesday, September 8, 2021

Happy Little Stampers - September Anything Goes with Dies


It's time for another round of Anything Goes with Dies over at the Happy Little Stampers Challenge blog.  


My most recent card for the HLS Christmas challenge centered around our theme of non-traditional.  For my card today I opted to assemble die cuts for a very traditional holiday theme.

I think I'd love to live at this house.  


Thanks to this wonderful Spellbinders set, this is another easy card to make.  I die cut each element from different colors of cardstock and followed their illustration for assembly.  One little trick that I do have is that I found it easiest to adhere the elements with clear tape on the backside so that I could adhere the entire piece to the card front as a single element.  I stamped the sentiment onto the rug and added some Nuvo drops to the floral centers. 

I invite you to visit our blog and join in on the fun.  Any use of a die qualifies you for our gallery and the challenge runs until the end of the month!

Supplies:
Spellbinders - Always Welcome die set (large die of the month for October 2020) 
Simon Says Stamp - Winter Friends stamp set (sentiment)
Tonic Nuvo Drops in Oyster Grey Gloss

Continue to stay safe and healthy my friends.   _____________________________________________________________________________

Thank you for visiting my little crevice of the crafty blogosphere.  Your time, comments and friendship are much appreciated.  

Happy Crafting!

Jules 


Color Hues #25


The team over at the Color Hues challenge are celebrating their one year anniversary this month.  The color duo for challenge #25 is Yellow and Orange and there are prizes involved if you would like to play along.


I pulled out three solid stamps and a bunch of Catherine Pooler inks to create my card.


I went for an abstract design, one I've been drawn to quite a bit recently.  There really was no rhyme nor reason to my stamping.   I created the focal feature by overlapping the three solid stamps and then stamped the dashes and sentiment over top with a crisp black pigment ink.  I trimmed down the panel, adhered it to a light tan card base and added my usual bit of clear droplets.  I really love this look and hope to make more in different colors.  

Many congrats to Nancy and her team!!!  


Supplies:
Ellen Hutson - Organic Elements stamp set
Catherine Pooler - Sincere Thanks stamp set
Catherine Pooler - inks

Continue to stay safe and healthy my friends.   _____________________________________________________________________________

Thank you for visiting my little crevice of the crafty blogosphere.  Your time, comments and friendship are much appreciated.  

Happy Crafting!

Jules 


Tuesday, September 7, 2021

CAS Colours and Sketches #436


A new month of weekly challenges await at the CAS Colours and Sketches blog. 
Today starts a new color challenge with this lovely trio selected by our hostess Jenny.  


Let's get right to it, shall we?

Hmmm....my pink is looking very magenta-ish in this photo but I assure you it is not.  


As you can see, I made a very CAS card with minimal supplies.  I stamped the three shapes in the horizontal center of the panel in two of the challenge colors and added in the third color (as well as gold embossing) to the centers.  I heat embossed the sentiment in white on a narrow strip of black cardstock, adhering it with some dimension.  I edged the panel with a gold paint pen and then popped it up with craft foam.  

I invite you to visit our blog and hope to see your card in our gallery!

Supplies:
Ellen Hutson - Organic Elements stamp set
Ellen Hutson - That Thing You Do stamp set
Catherine Pooler Inks

Continue to stay safe and healthy my friends.   _____________________________________________________________________________

Thank you for visiting my little crevice of the crafty blogosphere.  Your time, comments and friendship are much appreciated.  

Happy Crafting!

Jules 


Saturday, September 4, 2021

Happy Little Stampers - September Christmas Challenge

It's the first week of September which means it's time for another Christmas challenge over at the Happy Little Stampers Challenge Blog.  This month our optional theme is Non-Traditional.


Living in tropical South Florida means hot and humidity holidays with zero chance of snow.  Beach themed Christmas cards are common for me and fit the non-traditional theme wonderfully.


This card is comprised primarily of die cut elements and pretty straightforward in the process.  I paper pieced the surfboard using tropical colors, added a Santa hat to my dolphin and gave him plenty of waves in which to frolic.  I stamped my sentiment onto a trio of clouds which I rimmed with clear glitter glue.  Easy peasy card.

I invite you to visit our blog and hope to see your holiday card in our gallery!

Supplies:
Cottage Cutz - Happy Dolphin die
Cottage Cutz - Surfboard 1 die
GinaK - Tis the Sea Sun stamp set
Impression Obsession - Wave die set
Lawn Fawn - Ocean Waves die set
Lawn Fawn - Tiny Gift Box Hat dies
Ellen Hutson - Clouds die set

Continue to stay safe and healthy my friends.   _____________________________________________________________________________

Thank you for visiting my little crevice of the crafty blogosphere.  Your time, comments and friendship are much appreciated.  

Happy Crafting!

Jules 


Sisterhood of Snarky Stampers #193


It's time once for a new challenge up at the Sisterhood of Snarky Stampers blog.  Our challenge this fortnight is Paper Piecing.


Paper piecing is a really old technique but for those who may not be familiar with the term in a nutshell it's a technique by which you stamp onto colored and/or pattern papers, fussy cut the image and then assemble the pieces onto a blank image.  Clear as mud, right?  


In my example I stamped dear old Millie onto a piece of white cardstock and fussy cut her out, leaving a small white border around the edge.  I then stamped her twice more, first onto green polka dot paper and then again onto a turquoise striped paper.  I fussy cut both images right along the black line and then adhered them to the blank stamped image paper doll style. (Her top in the polka pattern, her skirt in the striped pattern.) I used Copic markers to color in her skin, hair and shoes as well as creating a bit of shadows onto the patterned paper pieces.  

For the background I die cut cardstock in various widths, adhered them to a piece of copy paper at a diagonal and die cut it with a stitched panel die.  I stamped the sentiment in black, adhered the panel to white card base, adhered dear Millie with a mini action wobbler and added some clear droplets as an embellishment.

I invite you to visit our blog and hope to see your paper pieced designs in our gallery.  Snark is appreciated but not a requirement.

Supplies:
Art Impressions - Millie stamp
Art Impressions - mini action wobbler
MFT - Anything But Basic sentiment stamp set
Memory Box - pattern papers
Simon Says Stamp - exclusive clear droplet mix


Continue to stay safe and healthy my friends.   _____________________________________________________________________________

Thank you for visiting my little crevice of the crafty blogosphere.  Your time, comments and friendship are much appreciated.  

Happy Crafting!

Jules 


Thursday, September 2, 2021

Seize the Birthday #222


It is time for new challenge over at the Seize the Birthday blog and if I'm being totally honest, the topping this time is not a favorite of mine.  The mere mention of the word Pastel makes me cringe, topped only by the word Purple.  


And in true transparency, I really, really, really struggled with the making of this card.  


I began my card by stenciling pastel pink and pastel lavender dye inks onto a white card panel.  I then cut the panel in two using a decorative die.  I stamped the sentiment onto a second white card panel using grey ink.  To make this a shaker card I added a piece of transparency behind the exposed diamond and then adhered two additional side pieces from fun foam.  I added in some pastel confetti to the middle, adhered the finished panel to the front of a white card base and adhered a sprinkling of confetti to the front.  

My pastel loving daughter loves the card.  I'd much prefer it in something deeper and bolder.  What do you think?

I invite you to play along with us at the blog and personally challenge you to create a pastel only card that will force me to change my point of view.  *wink*

Supplies:
Pinkfresh Studio - Simple Plaid stencil
The Greetery - Halfsies Diamond die
Simon Says Stamp -Gelato Confetti mix
Altenew - Celebration Sentiment stamp set

Continue to stay safe and healthy my friends.   _____________________________________________________________________________

Thank you for visiting my little crevice of the crafty blogosphere.  Your time, comments and friendship are much appreciated.  

Happy Crafting!

Jules