Saturday, October 31, 2020

Sisterhood of Snarky Stampers #172


Happy Halloween!!!  And whatdaknow?  October happens to have three Saturdays which means Edna has to work overtime this month. She's salaried so unfortunately she doesn't get overtime or holiday pay.  Maybe we should consider giving her a raise.

Her challenge this fortnight is X is for FauX which Edna is anything but.  Just sayin'.  


The definition of faux is as follows:

*  made in imitation; artificial.
*  not genuine; fake or false.


I decided to incorporate Faux into a technique which is often referred to as Faux Letterpress.  Traditional letterpress usually involves the use of a printing press and ink to create an impression into the paper.  My faux technique uses dye ink, an embossing folder and a die cutting machine.  You can see the results on the background of my card.


I began with the background.  I carefully inked up the inside of an embossing folder.  You want enough ink on the flat surface to get a good transfer while avoiding the depressed areas of the image, in this case, the Falalalas.  I then placed a panel of white cardstock inside the folder and then ran it through my die cutting machine.  The result was this beautiful panel of white raised lettering with a soft inked background which I set it aside while I worked on the rest of the card.  I created the red striped background by stamping a single three lined stamp one line at a time on a diagonal until the panel was covered.  It was a lot of work for something I basically covered up but I think the little bits that peek out were worth the effort.  I then stamped and Copic colored in my Grinch which I fussy cut after completion.  The sentiment was heat embossed in white onto the black cardstock strip.   

After photographing my card I realized that his hat and trim needed a bit of sparkle so I added a a layer of Stickles which you can see in this closeup.


This is definitely not the type of card that lends itself well to mass production but it was fun to make and I'm sure it will be fun to receive.  


Supplies:
Fun Stampers Journey - Falalala embossing folder
MFT - Striped background stamp
Riley & Co - Riley Grinch stamp and sentiment
Simon Says Stamp - Cloudy Sky ink (love this color!)
Distress Oxide - Candied Apple ink
Ellen Hutson - clear droplets


We invite you to Show Your Faux!!  And while at our blog be sure to admire the inspiration and leave some loving for my teamies.  Snark is always appreciated but not mandatory to play.


Stay safe and healthy my friends!  

_________________________________________________________________________

Thank you for visiting my little crevice of the crafty blogosphere.  Your time, comments and friendship are much appreciated.  

Happy Crafting!

Jules 


Friday, October 30, 2020

Let's Squash It - #1


I am back from a trip to North Carolina where I got both my Fin fix as well as my first taste of true autumn in almost 38 years.  It was wonderful!  

I was itching to play in my craft room so unpacking can wait.  There's a new challenge in town co-hosted by Jo, one of my teammies over at The Sisterhood.  The challenge is called Let's Squash It! and each month's challenge will involve the use of an embossing folder.  Fun idea, right?  

This first challenge is to combine a geometric embossing folder with metallic cardstock. 


I made time today to bust out a card so I could participate in their inaugural challenge, squeaking in just before the deadline.  I do love using metallics but boy are they ever a pain to photograph.  


FYI- Several of the products I used are part of my unlabeled stash so I don't have specifics.  Sorry.  


I began with the embossing.  I ran a piece of copper metallic cardstock through my die cutting machine using a geometric folder.  I reached for a sheet of cherry wood "paper" and die cut the bricks from the center.  I adhered the two pieces onto a dark brown card base and then cut a narrow piece of the same cardstock to serve as a border, heat embossing the sentiment prior to adhering.  I die cut two leaf sprigs and arranged them into a simple garland and added a small die cut flower (again from the copper cardstock) where the branches meet.  


Supplies:
WeRMemory - embossing folder, name unknown
Cherry wood sheet - manufacturer unknown
The Greetery - Brick Layers die set
GinaK - leaf die, name unknown
Hero Arts - sentiment stamp set, no name on package
Ranger - Liquid Platinum embossing powder

If anyone knows the names/brands of my unknowns please feel free to leave me a comment. I'd love to get them labeled.  Thanks!

Stay safe and healthy my friends!  

_________________________________________________________________________

Thank you for visiting my little crevice of the crafty blogosphere.  Your time, comments and friendship are much appreciated.  

Happy Crafting!

Jules 


Tuesday, October 27, 2020

CAS Colours and Sketches #394

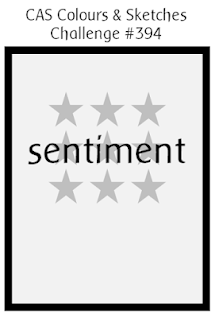
I am finishing up my month of hostess duties over at the CAS Colours and Sketches challenge blog.  and for our final October challenge I created the following sketch for you to try.


Sketches can be interpreted in many ways but my intent with this one was to use 9 images of identical shape (colors/patterns could vary) behind a sentiment.  (9 stars, 9 hearts, 9 diamonds, etc.)  As always feel free to rotate or flip the sketch to your liking.  


Here's how I interpreted the sketch.


I began by masking off the edges of a white cardstock panel.  I did some ink blending with a gradient of Distress Ink colors in the center of the panel and then added some shimmer splatters for a bit of visual interest.  After removing the masking I was left with a thick white border on the panel.  Next, I created the vertical stitches using a die.  I also die cut nine hearts from white cardstock and placed them along the vertical stitching in the pattern shown in the sketch.  I added a large die cut sentiment cut from black glitter cardstock and a smaller sub-sentiment stamped in black onto a narrow strip of white cardstock.  I adhered the finished panel to a piece of black and white patterned paper, leaving just enough peeking out for a very narrow border.  All that was left to do was adhere this to a white card base of 110 lb Neenah Solar White.

Supplies:
MFT - Stitched Hearts die set
MFT - Kind die
MFT - Bitty Thanks stamp set
MFT - Diagonal Stripes patterned paper

I hope you were able to play along with me this month.  I'll be watching for your creations in the gallery!!!


Stay safe and healthy my friends!  

_________________________________________________________________________

Thank you for visiting my little crevice of the crafty blogosphere.  Your time, comments and friendship are much appreciated.  

Happy Crafting!

Jules 


Friday, October 23, 2020

Color Hues Challenge #4


I actually have two inspirations for today's card.  The most obvious one is the color duo chosen for the current challenge over at the Color Hues blog.  I will be honest.  I have always despised the complementary color combination of blue and orange.  There.  Said It.  Out Loud Even.  


And in total transparency, I probably would have chosen to skip this challenge altogether if it weren't for the fact that my daughter was recently accepted to the University of Florida and yep, you guessed it, their colors are Blue and Orange.   I much prefer the black, gold and garnet colors of FSU where she was also accepted however she's decided to become a Gator.  And given that UF is half the distance away as is FSU, I'll happily embrace blue and orange.  


In honor of her accomplishments I created this card for my daughter.  


I began by ink blending the corners of a white cardstock panel using a stencil and Distress Oxide inks. I wanted some sort of a border so I used a checkered stencil to create a second background and then cut two lines of checkered strips from the patterns.  I adhered the blocked strips diagonally along the border of the blended edges. I die cut the sentiment from scraps of the orange and blue blended cardstock and layered them with a hint of a shadow.  I finished off the card with some glossy accents and tiny gold stars.  

Supplies:
PaperTrey Ink - Colorblock stencil set
The Greetery - Square Dance stencil set
Simon Says Stamp - Painted Congrats die
HoneyBee Stamps - gold stars


I haven't given her the card yet but I'm sure she's gonna love it.  She always does.  :-)


Stay safe and healthy my friends!  
_________________________________________________________________________

Thank you for visiting my little crevice of the crafty blogosphere.  Your time, comments and friendship are much appreciated.  

Happy Crafting!

Jules 


Wednesday, October 21, 2020

The Library Challenge #70


I haven't had a whole lot of time for extra challenges lately but I'm excited to be back to playing with Marina at her Library Craft Challenge blog.  She has selected a trio of paperback books to serve as our inspiration.


I've never read Girl, Woman, Other however I really liked Eleanor Oliphant and absolutely LOVED Where the Crawdads Sing.  It's currently my all time favorite book and I cannot recommend it enough. It will come as no surprise that I chose it's cover as my card inspiration.


I began my card by stamping out the waves in different colors of Distress Oxide inks.  I moved the stamp a bit each time to get the overlap in waves and colors. I masked off the waves and created a Distress Oxide ink blended background in shades of yellows/oranges/reds.  I stamped the reeds and the sentiment in a crisp black pigment ink.  I thought the serene image and embellishment free background was perfect for a sympathy card.  


Supplies:   
Taylored Expressions - Build a Background Waves stamp set
Your Next Stamp - Tall Grass stamp set
Altenew - Fresh Freesia stamp set (sentiment)


If you're a reader, do check out both Marina's card challenge as well as her book selections this week.  I'm so happy I had the nudge to create a card based on my favorite read.  (I've both read and listened to Crawdads and both versions are fabulous.) 


Stay safe and healthy my friends!  
_________________________________________________________________________

Thank you for visiting my little crevice of the crafty blogosphere.  Your time, comments and friendship are much appreciated.  

Happy Crafting!

Jules 

Tuesday, October 20, 2020

CAS Colours and Sketches #393


It's three weeks into October now and not an orange leaf in sight.   (For those who don't know, I'm in south Florida. ha!)  The weather here is still extremely warm so I chose a very non-autumnal color palette for this week's challenge over at the CAS Colours and Sketches blog.

We are also looking to add new Design Team members.  If interested you must participate in this week's color challenge as well as next week's sketch challenge.  For more details please visit the CC&S blog today.  


For our colour challenges, you must use all of the stated challenge colours. You may also use neutral colorus; however, the challenge colors should be the most noticeable ones featured on your card. We use Stampin' Up color names for reference, but you are welcome to use any other companies' products as long as you match the challenge colors as closely as possible.


I actually created two cards for today's challenge.  The first one, featured on our blog, is very CAS in nature while the second card was stepped up a notch.

We'll start with Card #1.   


I began by doing some ink blending onto three panels of smooth white cardstock in Distress Oxide colors that reflected the color trio.  I die cut the toadstool pieces from each of the three colors in order to do some mixing and matching.  I grouped them together on the left side of the panel and then stamped a sentiment in the darkest blue color on the right side.  I mounted the white panel onto a slightly larger one in beige, adhered them both to a white card base, and then added three little gold embellishments to finish it off.   

I had enough toadstools leftover to create a second card.  It's very similar to Card #1 however I stepped up the background a bit.  

Card #2

For this one I used a shiplap die to create the background using white cardstock on a stone colored card base. I grouped my toadstools to the right side and used a stamped sentiment strip for my greeting.  The card was finished off with a trio of clear droplets.  

I waffle back and forth as to my favorite but that's a good thing because it means I love them both.  :-)

I hope you find some time to come play with us.  I'd love to see your card in our gallery!

Supplies:
The Greetery - Toadstool Garden stamp set
The Greetery - Shiplap Builder die set
Ellen Hutson - Snailed It stamp set
The Stamp Market - Mini Hellos stamp set
Distress Oxide inks


Stay safe and healthy my friends!  
_________________________________________________________________________

Thank you for visiting my little crevice of the crafty blogosphere.  Your time, comments and friendship are much appreciated.  

Happy Crafting!

Jules 


Saturday, October 17, 2020

Sisterhood of Snarky Stampers #171


I hope it's a beautiful Saturday wherever you might be.  Halloween will be upon us in two short weeks and if you follow us at the Sisterhood of Snarky Stampers you know that we like to celebrate this holiday with a touch of pink.  I am once again the host for this fortnight's challenge which is ----


H is for Pink Halloween


We'd like for all entries to contain a bit of pink as a reminder of Breast Cancer Awareness Month. 


It will come of surprise to no one that I went with my tried and true theme of alcohol.  This time around I paired it with a punny sentiment to coordinate with my blitzed Halloween Jack-o-Lanterns.  


I began with an ink blended background of Picked Raspberry Distress Oxide which I edged slightly with a bit of Hickory Smoke Distress Oxide.  I added black splatters and stamped a horizontal ground with a bit of grass.  I then die cut the fencing, adding a bit of distressing to the edges. Next up was stamping, coloring and fussy cutting the Jack-o-Lanterns.  I created my own sentiment with alpha stamps and adhered the fencing and pumpkins to the pink panel.  All of this was then adhered to a black card base.  

Please visit our blog to see our Halloween creations, leave my teamies some love, and share your (pink) Creepy, Snarky and/or Cute creation in our gallery!  Snark is always appreciated but not mandatory to play.


Supplies:
Heidi Grace - pumpkin stamps (really, really old)
Mama Elephant - Gatefold Fence die
Ink Blot Shop - Get Grounded stamp set
Lawn Fawn - Milo alphabet stamp set
Distress Oxide inks


Stay safe and healthy my friends!  
_________________________________________________________________________

Thank you for visiting my little crevice of the crafty blogosphere.  Your time, comments and friendship are much appreciated.  

Happy Crafting!

Jules 
Thursday, October 15, 2020

TicTacToe #086 - Guest Designer


I recently received a second Guest DT invitation over at the Tic Tac Toe challenge blog and you know I can't say no to that!  I personally think of their boards as "a challenge with options" so I'm very excited to play along with their team once again. Here is this week's TTT board...


The idea behind the challenge is to pick any trio from the board (horizontal, vertical or diagonal) and use those elements on your card.  As luck would have it (OK, it's not luck.  It's online shopping but luck sounds so much better, don't you agree?) I had some new goodies that perfectly fit the bill for the Harvest box which narrowed my options down to two trios.  I went with the vertical column of Harvest, Circle and Fall Sentiment for my card.


Perhaps it's the fact that a wagonful of pumpkins will never happen in Florida but I love this card!!!

I began with three die sets...one fall leaves, one pumpkins and one wagon.  I die cut the elements in various colors and then added a bit of ink distressing to the edges.  After assembling my ample Harvest I die cut a slightly off center Circle from a white cardstock panel.  I stamped the Fall Sentiment in the upper portion of the circle and then adhered my bountiful wagon to the lower portion.  I adhered the panel to an olive green card base and called 'er good.  

I hope you'll come play along with the gals over at TTT.  It's such a fun way to perhaps add something a bit different to your cards.  

Supplies:
HoneyBee Stamps - Itty Bitty Leaves die set
HoneyBee Stamps - Itty Bitty Pumpkins die set
HoneyBee Stamps - Little Red Wagon die set
Neat&Tangled/Simon Says Stamp - Hello Pumpkin stamp set
Poppystamps - Spinning Circles die set


Stay safe and healthy my friends!  
_________________________________________________________________________

Thank you for visiting my little crevice of the crafty blogosphere.  Your time, comments and friendship are much appreciated.  

Happy Crafting!

Jules 


Tuesday, October 13, 2020

CAS Colours and Sketches #392


Hello friends!  I am hosting this week's sketch challenge over at the CAS Colours and Sketches blog and do hope you will come and join us.  

I must confess that my Photoshop skills are very rusty. I hadn't created a sketch since my scrapbooking days almost a decade ago.  (I didn't even have PSE downloaded on my computer but thankfully I had the CD version.)  It took some floundering but eventually I got back into the swing of things and created this landscape sketch.   

As always feel free to flip and rotate when creating your challenge card.  


Creating my card was far easier than creating the sketch.  Ha!


I began with the circle element.  I inked the raised dots of a circle glimmer "die" and then ran it through my die cutting machine with an embossing mat.  The light blue ink was transferred to the white panel in the depressions left by the "die."  I love the subtle hint of this circle.

My next step was to do some stamping and traditional die cutting.  I used three complete floral branches as well as several pieces that I trimmed down to create some heft to my sprig.  It's rather difficult to see but I also included a flourish of vellum underneath the the stamped images.  It's a bit easier to see in this closeup.


I stamped my sentiment in a crisp black pigment ink, adhered the panel to a blue card base and then added a bunch of gold pearls to the sprig to finish it off.  

Come give me some love and play along with us over at CC&S.  (If that sounds like a beg, it is. LOL!)


Supplies:
The Greetery - Birthday Blooms stamp and die set
The Greetery - Thinking of You stamp set
Spellbinders - Essential Glimmer Circles
MFT - Large Leaf Flourish die
Studio Katia - Gold Foil Pearls


Stay safe and healthy my friends!  
_________________________________________________________________________

Thank you for visiting my little crevice of the crafty blogosphere.  Your time, comments and friendship are much appreciated.  

Happy Crafting!

Jules 


Saturday, October 10, 2020

You Still Got It !


Good morning everyone.  It's only the 10th but October has already been a crazy busy month for me, creatively and personally.  (All good things.  Whew!)  While I've been feverishly creating blog content, there's very little that I can share yet.  I did however recently receive a request from a friend for a flamingo card and you all know I can always make time for flamingos and sharks.  :-)


Here's what I whipped up...


This one was pretty simple to create.  I started by stamping, die cutting and Copic coloring my flamingo and palm tree.  I did a bit of Distress Ink blending onto the center of a white cardstock panel and added a bit of water splatters for interest.  I added a very narrow strip of gold cardstock as well as a slightly wider strip of black/white diagonal striped patterned paper to the left edge of the panel and matted the whole thing to a piece of black cardstock.  I decided to tilt the panel on the card base but kept my flamingo and palm in the vertical position.  I heat embossed the sentiment in white onto a banner of black cardstock which I positioned below my flamingo.   A trio of gold foil pearls was the finishing touch.  

While you all are enjoying your fall weather, we're still flamingo'ing it here in South Florida!  

See ya back here on Tuesday with another CC&S challenge.  Same bat time, same bat station.  (Totally dating myself but hey, it is what it is and I'm happy to be here.)


Supplies:
WPlus9 - Flock Yeah stamp and die set
MFT - black and white diagonal striped 6x6 paper pad
Studio Katia - gold foil pearls


I'm linking this one up to the current Inkspirational Challenge of Angle It.


Stay safe and healthy my friends!  
_________________________________________________________________________

Thank you for visiting my little crevice of the crafty blogosphere.  Your time, comments and friendship are much appreciated.  

Happy Crafting!

Jules 


Tuesday, October 6, 2020

Cas Colours and Sketches #391


It's October!  Where is the Florida Fall Weather Fairy?  If she's with you please send her my way.  

I will be this month's hostess at the CAS Colours and Sketches challenge blog and we're starting you out with a color challenge.  Because it still feels like summer here in Florida I decided to go with the following color trio....


For our color challenges, you must use all of the stated challenge colors. You may also use neutral colors; however, the challenge colors should be the most noticeable ones featured on your card. We use Stampin' Up color names for reference, but you are welcome to use any other companies' products as long as you match the challenge colors as closely as possible. 


It's bright, isn't it?  And definitely different for me but that's what challenges are all about.  Here's my card....


I used three shades of Distress Oxides to create my color trio.  I did some ink blending onto smooth white cardstock and then die cut a circle from each piece.  I adhered the three different sized circles onto a white cardstock panel, cut slightly smaller than an A2 size.   I then stamped and die cut three coffee/tea cups using the same three color inks and positioned one in each cup, making sure to vary their colors.  I die cut the hearts from leftover inked pieces and stamped the greeting in the lower right corner of the panel.  I think it turned out very fun.

I hope you visit our blog and see what my teammates created with this very bright trio of colors.  Maybe you'll even try your hand and share it in our gallery!

Supplies:
MFT - Stitched Circle Stax dies
MFT - Coffee Date stamp set
MFT - ala Mode Miss You a Latte stamp set (sentiment)


Stay safe and healthy my friends!  
_________________________________________________________________________

Thank you for visiting my little crevice of the crafty blogosphere.  Your time, comments and friendship are much appreciated.  

Happy Crafting!

Jules 


Saturday, October 3, 2020

Sisterhood of Snarky Stampers #170

Wow.  It's October already, can you believe it?  Schools have been back in session for awhile now, be it in person, virtual or hybrid.  No Zoom, Google Classroom or Promethean boards for Edna though.  She's going Old School with C is for Chalkboard for our new challenge over at the Sisterhood of Snarky Stampers blog.      


And if you ask me, she's certain to scare small children.  


I am so happy I no longer have any little ones at home.  I'm a substitute teacher (or was, before Covid...they don't pay me enough for that now.  LOL!) so I know the struggles that teachers/students and especially parents are going though right now.  My chalkboard message is for the parents.....


....however I do believe we can all relate, right?  Wouldn't it be great if everything becomes magically better at the stroke of midnight, 2021?  

This design is pretty simple.  I stamped and heat embossed the sentiment in white onto black cardstock.  I stamped out the wine and glass, colored them with Copics and then fussy cut them right to the edge.  I added a frame die cut from kraft cardstock and then added the whole thing so a side folding 110 lb. card base.  

Check out our blog for our Sistah's chalkboard creativity.  I hope you find something there to inspire you to join in on the fun!  Snark is awesome but not required.  

Supplies:
Simon Says Stamp - Time for Wine stamp set
Kat Scrappiness - Woodgrain Frame Diamond die
Kelly Purkey - Mulberry Alpha stamp set
MFT Max Alpha stamp set (the ?)


Stay safe and healthy my friends!  
_________________________________________________________________________

Thank you for visiting my little crevice of the crafty blogosphere.  Your time, comments and friendship are much appreciated.  

Happy Crafting!

Jules