Wednesday, April 16, 2025

For Spellbinders - Simon Hurley Up and Away


I'm here today to showcase another new and very cute set sent to me by Spellbinders.  It's part of the Simon Hurley The Sky's the Limit Collection.  This one is called The Up and Away Set which comes with a kite and a figure that you can customize into a boy or a girl.

I chose to create a girl for my first card.  I positioned her flying against a stenciled background with a purple and white kite.  All elements were cut from colored cardstocks.


My second card is a bit more elaborate.  I chose to make this one a boy with a cap, leaving off the whirly top section included in the set.  I added some texture to the background with cloud embossing folder and positioned the young man floating up over a house created with an extremely old Spellbinders die set.

I chose to make both cards birthday themed since my stash for children's cards is very limited at the moment.


I used a bit of white pigment ink to puff up my clouds a bit.  All elements were cut with colored cardstocks.


If you use my Spellbinders Affiliate Links to make any purchase it earns me a bit of crafting cash at no additional expense to you. TIA!

Card One
Spellbinders - Simon Hurley's Up and Away die set 
Spellbinders - Stylish Oval Birthday sentiment stamps (appears to be no longer available)

Card Two
Spellbinders - Simon Hurley's Up and Away die set
Spellbinders -  Hand Drawn Scallops embossing folder (available in a bundle)
Spellbinders - Die D Lites S2-251
Spellbinders - Diamond Plaid embossing folder
Spellbinders - Sentiments of Wonder Better Press and dies
Spellbinders - Die D Lites S2-251 (super old...the house and florals)
Fun Stampers Journey - Above the Clouds EF (really old)


Thanks again so much Spellbinders!  I always appreciate the opportunity to work with you.

I hope you enjoyed my cards today.  Your visit here is much appreciated!

Jules

Tuesday, April 15, 2025

Wedding Cards


I have spent a bit of my free crafty time creating cards to fill the holes in my stash.  I recently discovered that I had little, if any, wedding and/or baby themed cards.  Today I'm sharing a two-fer of wedding themed cards.  


Believe it or not, I actually began with this gorgeous outer frame.  It's a recent purchase from Jillian Vance Design.  She was having a 50% off sale (which is still ongoing, by the way) and I picked up this Art Deco Backdrop set along with a couple of other die sets.  Unfortunately the one I received was a manufacturer's dud.  I emailed her, sent her some photos and I had a new set on it's way to me the next day.  What you see cut above are from the replacement which cuts like buttah!  I was so impressed with their customer service that I ordered a few more items with the continued "before the tariff" sales.  (Don't even get me started on that subject!)  Anyway...I just wanted to give them an UNSPONSORED Shout Out for their excellent service after the sale.

On to the rest of my card...

I pulled out a very old set from MFT for the focal image.  It's hard to tell but both the black and the white cardstocks are from the Spellbinders Brushed Collection. If you don't own these you should really check them out.  They're just so beautiful!  Card One does a white frame on light blue cardstock while Card Two does a blue frame on white cardstock.  I added a trio of little pearls to each card as a final touch.  I really love how these turned out!

If you use my Spellbinders Affiliate Links to make any purchase it earns me a bit of crafting cash at no additional expense to you. TIA!


Spellbinders - Brushed Black cardstock 
MFT - Let's Say I Do die set 
A Jillian Vance Design - Art Deco Backdrop die

I will be back soon with a whole slew of Baby Themed cards.  Until then, Happy Crafting and Thanks for Visiting!

Jules

Thursday, April 10, 2025

Seize the Birthday #303


It's time for another challenge over at the Seize the Birthday blog and our fearless leader Nancy is the host.  She has chosen a fun Topping which may only be challenging for the tried and true CAS card makers.  She's asking for Layers.

I took the prompt literally and added gobs of paper layers in the form of frames and florals.


And I had enough florals leftover to create a pretty bookmark.


My design started with a old piece of designer paper from my stash.  I don't even know who made it since it was loose and not tucked inside a pad.  The colors really drew me in.  I'm still digging through my NBUS bin so today's pick was a set of daisy dies.  I matched up the paper colors with cardstock scraps from my stash and went to town die cutting.  I embossed the front of a yellow card base, added a matted oval and then layered the florals until I got something I liked.  The sentiment was heat embossed in white onto brown cardstock.  I used the leftovers on a bookmark.  

If you use my Spellbinders Affiliate Links to make any purchase it earns me a bit of crafting cash at no additional expense to you. TIA!


Supplies:
Spellbinders - Modern Ovals die set (a fav of mine)
Spellbinders - Layered Daisies die set (NBUS)
Altenew - Birthday Greetings stamp set
The Greetery - Opposites Attract stamp/die (tag)


Hi Darnell!  Miss me?  LOL!


I invite you to play along!  We love to see the use of Toppings in our gallery however if it's not your thing, any birthday card works.  

Thanks so much for visiting!!!  Your time and comments are much appreciated.

Jules

Saturday, April 5, 2025

Sisterhood of Snarky Stampers #261


It's the first Saturday of the month which means we have a new challenge up for you over at the Sisterhood of Snarky Stampers blog.  Our newest theme is Masculine.  I opted for a two-fer featuring bourbon on the rocks.  That in and of itself is not necessarily manly because this happens to also be one of my favorite adult beverages.  Whether it's straight up with ice or in a Manhattan (my personal fav) or perhaps an Old Fashioned, bourbon obviously isn't just for men.  I'm hoping that my choice of kraft and plaid papers gives these cards a more masculine feel.


With Snark


Love her!


Sans Snark


I used a slightly textured kraft cardstock from Neenah as the card bases.  The lined kraft paper is from a really old pad of 6x6 papers and as you can see, I positioned it on an angle.  The orange plaid/tweed papers are from a purchase made last fall.  I opted to position these vertically.  I stamped, colored and die cut the cocktail, also positioned vertically.  I adore these stamp sets from Unity.  Their designers have been speaking my language in recent years.  

Supplies:
Unity Stamps - If You Were Whiskey stamp set
Brutus Monroe - Autumn Tweed 6x6 paper pad
7 Gypsies - Postal 6x6 paper pad (this is ANCIENT)
Basic Grey - Basic Kraft 6x6 paper pad (EVEN MORE ANCIENT)


More for Darnell's viewing pleasure.  
Sorry, not sorry.  


I invite you all to visit our blog for additional Manly Snark.  Snark is optional however the masculine theme is not.  

Thanks so much for visiting me.  Much Appreciated!

Jules


Tuesday, April 1, 2025

Color Hues #107


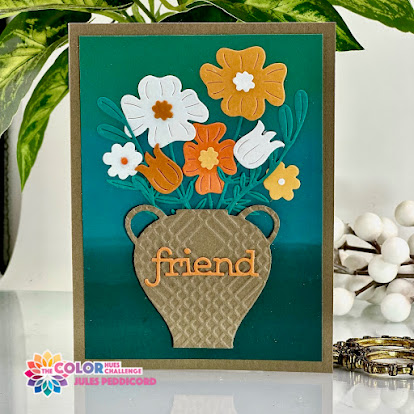
Hello Crafty Friends!  I am the hostess of our latest Color Hues challenge and I've chosen the combination of Teal and Orange for you to work with this fortnight.  I unintentionally had myself a die cutting marathon, resulting in three cards and four tags to share with you all today.  Let's start with the one I posted on the Color Hues blog...


NBUS!


I had enough florals to create this second card.


And because I wanted to dig a bit more 
into my NBUS bin I also made this card.
NBUS!


And I certainly couldn't waste the
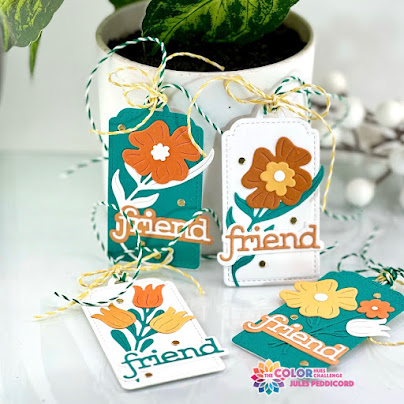
remaining florals, so tags it was!


Card #1 and #3and began with an ombre' direct ink pad to paper technique with three teal hues of Catherine Pooler dye ink.  

Card #1 utilizes die cut florals, an embossed vase and a die cut sentiment.  

Card #3 uses sky themed dies, a die cut penguin and a Better Pressed sentiment. 

Card #2 utilizes a bunch of leftover florals arranged on a teal panel of cardstock.  This small panel was adhered to white cardstock die cut with a cover plate.  This entire piece was then adhered to a black card base.  The sentiment and shadow were also die cut.

The tags were created with all of the floral bits and bobs leftover along with the same die cut sentiment used on my first card.  


I'm sharing affiliate links for the first time.  If you purchase through my link I get a small commission at no extra cost to you.  All of the products I've linked to today were purchased by me.  Thanks!

Supplies:
Spellbinders - Fresh Picked Vase Bouquet (NBUS)
Simon Says Stamp - Friend die
Spellbinders - Diamond Plaid embossing folder (NBUS)
The Greetery - Hey Honeycomb Penguin die set
Spellbinders - Rain or Shine die set
The Greetery - Square Dance cover die
Simon Says Stamp - Thanks die and shadow
Catherine Pooler Inks

Thanks for humoring me in this longer than usual post.  Do you have a favorite? I'd love to know in the comments.

Please welcome Renate as our Guest Designer for this challenge.  I invite you to visit her work as well as those from my teammies on our blog.  

Thanks for visiting!

Jules 

Monday, March 31, 2025

For Spellbinders - Spring Plushies in Card Form

 
I am back today to share two cards I created using the Spring Plushie dies sent to me by Spellbinders.  They were designed with wool felt in mind however they also cut cardstock and designer papers fabulously.  

Up first is the card I created using the Cozy Cluck die set designed by Nichol Spohr.  Because of it's large size I opted for a 5"x7" (A7) dimension rather than my customary 4.25"x5.5" (A2) size.  I chose what I think are country styled designer papers for a folksy look.  I embossed the background with a Spellbinders folder and added some stamping from an older set made by Ellen Hutson.


My second card was created using the Carrot Companion set of dies.  This set includes dies for both an adorable bunny along with a cute carrot.  I opted to use only the bunny which I die cut from cardstock.  You can see by the photo that I chose to leave all of the little "pokie pieces" intact this time.  I added a cover plate background and some florals, both from older Spellbinder releases.  A "Somebunny Loves You" sentiment is stamped on the inside panel. I'll be sending this one to my grandson along with the plushie. 


Supplies:

Card One
Spellbinders - Cozy Cluck die set
Pink Paislee - 6x6 paper pad
Ellen Hutson - Good Egg stamp set
Spellbinders - Leafy Helix embossing folder (one of my all time favs)

Card Two
Spellbinders - Carrot Companion die set
Spellbinders - Glass Effects cover die (really old)
Spellbinders - Hop into Spring SDOTM - March 2019 (florals)

Thanks again Spellbinders for the opportunity to work with you.  And thanks to all of you who visit and take the time to comment.  Much appreciated!

Jules

Friday, March 28, 2025

Spellbinders - Spring Plushies


I am honored once again to have been sent some of the latest products from Spellbinders.  In this post I'm sharing two projects I created using Nichol Spohr's Felt Stitch and Create line.

Up first is my favorite of the two.  I love the color red and knew I wanted to make my Cozy Cluck chicken from a red/orange/yellow combination.  I'm really happy with how this one turned out.  She was created sans filler and will be displayed in a place of honor in my kitchen.  (I may make her a magnet, not sure yet.)


Isn't she just the sweetest thing?


I was also sent this fun duo of Felt Carrot Companion dies.  The two plushies are separate however I stitched them together to make a single hanging ornament.

My daughter-in-law keeps a small table top Christmas tree in the foyer area at 
the top of their stairs so I thought this would be a perfect Easter display.  I know 
my grandson will love it.  This one was stuffed with snipped cotton balls.

Some personal thoughts....I had a much easier time with these spring elements compared to the Christmas ones.  So much so that I now consider myself an intermediate with regards to stitching.  LOL! It helped too that I used a stiffer felt available here on Amazon.  Spellbinders also sells felt but I didn't have the correct colors on hand for these projects.  I used embroidery floss from a local box store for all of my stitching.  I used Aileen's Felt and Foam tacky glue for the pieces that weren't stitched on.  I highly recommend this stuff as my tried and true Bearly Arts did not work on this stiff felt.  (It did however work great on the Spellbinders felt I used in December.)

So?  Cute, right?  I will post some card projects using these two sets soon.  Remember, these dies are not just for plushies!

Thank you Spellbinders!  And thank you all for visiting.

Until next time, 
Jules